Friday, January 29, 2016

"Tasty Collage" - Pepper Steak

If you are on Facebook you've probably enjoyed
those bite size, fast motion videos with yummy recipes
that end with "Oh Yesssss"!
They are called buzzfeedtasty Videos  - click on the link to see some.
I love them and have actually tried some of those "tasty" recipes with good success.

Here's my version of a "tasty collage" - no video - sigh.
You'll have to use your quick video imagination.


This recipe comes from my old Betty Crocker Recipe Card Library C 1970's.
Do you remember those? Mine is even in the typical 70's avocado green colour!


This file lives in my Hoosier cabinet (top right corner) and gets pulled out on occasion for some of those
oldies, but goodies ....


Many years ago, my sister Evelyn lived with us in the city while she attended her last couple of years in high school. Even back then, as a teenager, she was a good cook.

She pulled this recipe card and treated us with a delicious dinner.

Maybe, just maybe, having this recipe library available to her is what helped make her the great cook that she has become?
Actually - Evelyn has followed in our Mother's Good Cooking footsteps and she even married a Cook (her married surname) - so appropriate.


The recipe (slightly revised):

PEPPER STEAK
1 1/2 lbs. round or sirloin steak - sliced across the grain into 1/4 X 2 inch slices
1/4 Cup Oil - I used Avocado Oil
1 Cup Water
1 medium onion - sliced
1/2 tsp. garlic salt - I used 1 clove garlic and 1/2 tsp. sea salt
1/4 tsp. ginger - I used 1 Tbsp. fresh ginger - chopped
2 medium green peppers - I used 1 green and 1 red pepper - cut into 3/4 inch strips
1 Tbsp. corn starch
1 tsp. sugar
2 Tbsp. soy sauce
2 medium tomatoes - wedged
Heat oil and brown meat for 5 minutes or until nicely browned.
Stir in the onions, garlic, salt, ginger and the water. Reduce heat, cover and simmer for 12-15 minutes.
Add the pepper strips during the last 5 minutes of simmering.
Blend the cornstarch, sugar and soy sauce and stir into meat mixture for 1 minute until thickened.
Gently stir in the tomato wedges, cover and heat through for an additional 3 minutes. Serve over your favourite rice.


Oh Yesssss!

Sometimes the "old" recipes that remind us of good times are the best.
This made a nice easy dinner for a cold, end of January, Friday night dinner.

There's another thing that warms my heart .... on these cold winter nights.
One of my almost daily pictures of our little love.
The farmer and I look at these text message photos
 over and over again with broad smiles and fuzzy warm feelings.

We also get the most delightful "bite sized" videos of this little lady.

Can you spot her loving mommy and daddy in the reflection?


Till next time ....... enjoying the last days of January and looking forward to a busy February.


Monday, January 11, 2016

Poached Pear Dessert

The new year has begun and light desserts
are/should be on my menu!

I don't usually make New Year's Resolutions but I am resolved
to eating healthier and making the job of staying active my new career!
It's never too late to start is it?
Since celebrating my 64th a few days ago there's no time to waste - eek.

This pretty and delicious dessert
is easy to make and makes a perfect finish to any meal.
Introduced to me by a dear friend some years ago who is forever elegant.
She even brought along her own margarita glasses to present this dessert.


Any ripe and firm pear will do but I like to use Bosc Pears when available.

Simply core the pear with a melon baller from the blossom end. It takes two or three "scoops" and the core is out.

Carefully peel the pears leaving the stem intact.


Add the peeled and cored pears to your favourite poaching liquid.
The recipe I use is:

2-3 Cups cranberry juice
2 bay leaves
1 star anise
5 whole cloves
orange zest (optional)
2-3 cinnamon sticks

Gently simmer the pears for 10-15 minutes, turning occasionally with a large spoon. Pears should be tender but still hold their shape.


Drain the pears and cool.
Pat them dry and place upright on a serving plate
(they look so great served in a Margarita glass)

Scoop a ball of ice-cream and drizzle with caramel sauce (see recipe below).
Also, lovely served with a sprinkle of roasted nuts or a rolled wafer!


You can make your own delicious caramel sauce or purchase a good quality one for this dessert.

Caramel Sauce:

½ Cup granulated sugar
¼ Cup brown sugar
1 ½ Cups heavy cream
Put granulated sugar in a heavy saucepan and crumble the brown sugar on top.  Melt the sugars over medium heat undisturbed until the granulated sugar is mostly melted.  Continue to cook, stirring with a fork until a deep golden caramel – watch closely.  Carefully pour in the cream (mixture will bubble up and caramel will harden).  Simmer, stirring until caramel is dissolved and sauce is reduced to about 1 Cup – approx. 10 minutes.  Cool slightly before pouring on pears or serve as a cold sauce.


Till next time .......... gathering my lean and healthy recipes and meal plans. At least I'm trying.


Friday, January 1, 2016

The Tree of Life Barn Quilt


I have always been intrigued by and loved the
quilt pattern called
"The Tree of Life"

To me, trees signify stability, deep roots, shelter, and hope
for generations to come.
They enrich the air we breath and provide fruit for us to eat.

Many years ago, in 2003, we had a very large international family
reunion and I was inspired to make a Tree of Life quilted wall hanging
to be auctioned off at the event.
Years later, as in a couple of years ago, I incorporated that same
pattern into a small quilt I pieced for our RV trailer.


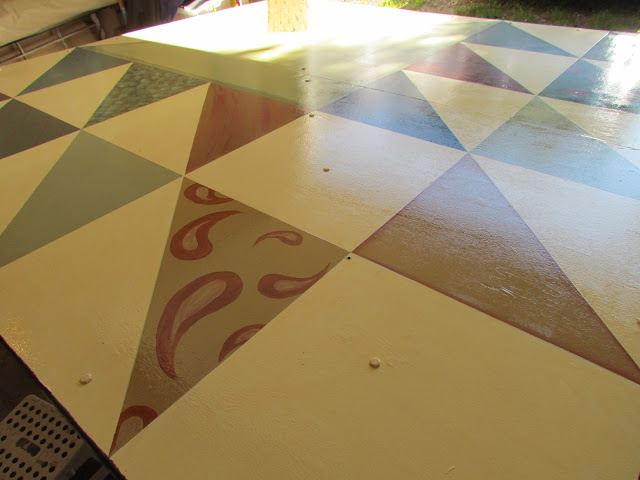
This pattern was also the inspiration for me to paint 
a very large "barn quilt".


2 4X8 pieces of plywood were set up in our driveway and painted with 4 coats of primer.

The process had begun!


The "quilt" took up most of the garage which was a good incentive to keep working at it because we do like to park our car in there!


The basket of my old folk art paints was hauled out of the upstairs closet and the colours were chosen.
I hadn't used these paints for a long, long time and some were completely dried up.
This was a great project for using up these colours.
The summer flies and mosquitoes also made their "impressions" on this work in progress.


The intention was to mount it on the West side of our old barn
(the side that faces the house and just for us to see)


The other 3 sides of the barn had been covered with steel soon after 
we moved here (36 years ago).
As we talked about where to hang the "quilt" we realized that perhaps
this side of the barn should be sided with steel too before we do that.
The mounting was delayed and the very heavy 8 foot X 8 foot Tree of Life
was moved into the barn till further notice!

A couple of weeks ago, the end of December 2015, the workmen came to remove
the old worn barn boards and to put up the new steel siding.
The weather was perfect - unusually mild for this time of year.


They came with the self propelled boom and we asked them if they would do one more thing
for us before they leave - you can guess what it was.
I was super excited!


These young, strong and fearless Amish workers were willing and able.
We just stood back and watched as they hoisted that heavy quilt and bolted it into place.


On the last day of the year 2015, my barn quilt has finally been mounted.
It will aways remind me of the year our darling Granddaughter was born
and of how blessed we truly are.

This is my "YES" picture ....


Now - what can I make with those beautiful old and worn barn boards?
I think the farmer is worried.

This is the first day of 2016, the snow is falling, the wood stove is glowing,
and I'm still in my PJs (and it's 5:30 5:53 p.m.).
Oh, and there's a quilt outside my window!


HAPPY NEW YEAR!!!!!


Hope for the Season

  First Snow! November 14-16 held some "bench visits" with the Leis family, to commemorate that day/week 3 years ago! We miss him ...