Tuesday, October 30, 2012

Nazareth Village Lentil Soup


This simple and delicious lentil soup was served to us at the Nazareth Village in Israel.  It was prepared by Mary who fed us each day "in the Spirit of the First Century"!  I made it yesterday for our lunch as we anticipated the big storm.

Ingredients:
2 Cups lentils
4 Cups water (I added a bit more near end of cooking)
1/4 Cup Extra Virgin Olive Oil
3 spring onions - chopped (I used green onions)
2 cloves garlic - minced
1 tsp. baking powder
1 tsp. cumin
1 tsp. salt or to taste
Black pepper to taste
Mix together and simmer on low for 1-2 hrs.


It was so amazing to spend
a few days "in the first century" village......
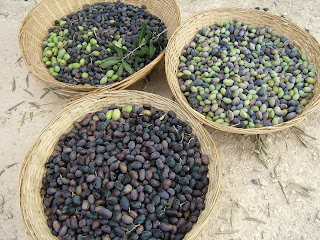
having the opportunity to help with the Olive Harvest!
We felt like we really were back in the time of Jesus,
plucking olives from the ancient trees!


There is even an authentic ancient Olive press there, not to 
mention a real donkey that obediently turns the large pressing stone!


Fellow "villagers"


If you want to visit the Nazareth Village's web site
you will see the video clip called Olive Harvest 2012 of us bringing in the harvest
of the day led by David theShepherd!!
Hallelujah!!!


Monday, October 29, 2012

Garden's Last Hurrah!

Here we are .... already the last days of October 2012!!
A huge storm that some are calling
Frankenstorm, is on it's way and the
Eastern Seaboard is bracing and preparing!
Praying for safety and minimal damage.

Saturday was a blitz of "last of the season gardening" here on the farm.
It's very wet, muddy, and a promise of more rain and wind to come.
The corn is yet to be harvested and we are hoping for
some more typical fall weather so these crops can still be brought in!

In the meantime, we did as much work outside that we 
could cram into one afternoon.....
The farmer climbed onto the ladder and scooped pails of pine needles
out of the eaves troughs, the tired looking annuals were
pulled from the window boxes and flower pots,
the dahlia bulbs were dug from their muddy beds.
Gourds, a few pumpkins and beets got rescued from the back garden,
peonie plants got a haircut, 
and some of the house plants were plucked from their summer home
(the back deck) and returned to their Winter rooms.

So much more to be done outside.........
but all in all it was a productive day!


Garden's Last Hurrah!


Dahlia bulbs - my new favourite flowers - thanks to my co-worker Sara!!!

Sunday was the day for our annual Family Gathering
on my Dad's side.
My Grandparents had 10 children, each of those children
including my Dad had large families of their own,
That's my generation (the grandchildren) and now there are
great and great-great grandchildren and great-great-great grandchildren.......
need I say more?

If everyone came we could not possibly accommodate this 
large "Freundshchaft"!!!
I can't even tell you how delicious the food is that
appears on those pot-luck tables each year!!!  It's unbelievable!
We ate so much and had such a nice visit with cousins and friends!
Thanks to the hosting family - you did a super job!

Sunday suppertime came but no one was really hungry
so we resorted to the favourite
pop-corn and TV Sunday night.
Hot buttered popcorn, a few episodes of Downton Abbey,
and The Amazing Race = the best kind of Sunday evening.

Ye 'olde popcorn pot still works the best!!!


Browned butter is a must!


"That's a Bowl" full of deliciousness

This Sunday night "tradition" comes honestly
as my mother often made this for Sunday supper as well.
She always used her special popcorn pot - I do too
She used lard - I use Grape Seed Oil
She salted the popped corn from her salt crock - I do too
She browned the butter - I do too
My daughter has her own special popcorn pot too....
the tradition continues.


Till next time ............ batten down the hatches, put an extra pitcher of water in the fridge and fill the woodbox.



Wednesday, October 24, 2012

Unpacking


What an amazing trip!!!
We just returned from the Holy Land
and have much to think about.
From the breath taking views of Arbel
to the salty waters of the Dead Sea
to the beautiful cities of Jericho, Bethlehem,
and Jerusalem, the City of David.

Memories of this trip are many and will
be with us for the rest of our lives.
Some souvenirs that we brought home were,
a water colour painting of the busy Via Dolorosa streets,
beautiful Hebron glass water glasses,
Olive wood figurine, fresh dates,
Olive Tapanades, spices,
a few stones and sea shells from the Sea of Galilee,
some silver coins and shekels,
and a camera full of pictures!


This was a service tour and the 
first 2 days were spent helping
with the Olive Harvest at Nazareth Village, 
a first century experience for visitors and tourists.
This was definitely one of my highlights
We were dressed in first century clothing
as we picked olives, ate some wonderful
lentil soup, date spread, flat breads,
and drank a lot of water - it was very hot!
We were even used as "extras" for a film
crew that was there on the last day.


We had trouble recognizing each other as we worked! That's me and the farmer top right in the back, our pastor and wife (tour leaders) directly in front of us and our friends Jan and Dave far left, with new and old friends in between!


Many ancient ruins in such places like Capernaum, Tiberias,
and Qumran


A very moving communion service at the Garden Tomb
and a visit to Bethlehem's The Church of the Nativity
and a special siting of a real shepherd in the fields near Bethlehem!


We were blessed to walk where Jesus walked and have
found new life and meaning in the holy scriptures!

Our eyes were also opened to the plight of Palestinians who
are trying to live in this parched land!
Sadly, it seems as tho "Peace on Earth" has a long way to go.


Until next time ..........tackling loads of laundry!  Thankful that I have water for this task, unlike some
of our friends in Bethlehem!


Wednesday, October 10, 2012

Rustic Peasant Rosemary Bread


This bread can be made with 
Rosemary, Green and Kalmata Olives,
and or Sun Dried Tomatoes

I used Rosemary (that is still growing in my herb garden)
and some chopped Sun Dried Tomatoes.
It turned out really yummy!
I think I'll be making this again - soon.
The only problem is that I'm trying
not to eat so much bread these days.
It must be the cool weather that's making me crave these "comfort" foods??!!


Recipe:
1 1/2 Cups warm water
1 tsp. sugar
1 Tbsp. yeast
5 - 6 Cups Flour (I used all-purpose but you can use a mix of white and spelt as well)
2 Tbsp. Olive Oil
1 Tbsp. Rosemary - finely minced
1/2 Cup Sun Dried Tomatoes - roughly chopped and/or Olives - roughly chopped
2 tsp. salt


In a large bowl (or in your stand mixer bowl) mix the warm water with the sugar and sprinkle the yeast on top.  Let stand until bubbly and frothy - approx. 10 minutes.  
Stir in 1 Cup of the flour, salt, Rosemary, Sun Dried Tomatoes and olive oil.  Add remaining flour 1/2 Cup Flour at a time until dough forms a ball.  If using a stand mixer - mix the flour in with a dough hook and when dough forms and comes away from sides of bowl, continue mixing for approx. 5 minutes.  If mixing by hand - knead the dough for 8 - 10 minutes to form a smooth elastic ball.
Form a ball and place dough into a greased bowl, flip it over so top gets coated with oil, cover with plastic wrap and let rise for approx. 60 minutes or until doubled in bulk.  I have a "proofing" setting on my oven and this works so well for this step!
After the first rise, punch the dough down and allow to rest for 10 minutes.  Divide the dough in half and on a lightly floured surface shape each piece of dough into a rough circle.  Place the "loaves" on a parchment lined baking sheet, cover and let rise again for approx. 40 minutes.  
Lightly dust the tops with flour and with a sharp knife, cut three slits into the top of each ball.
Bake the bread at 425 degrees for 15-17 minutes until bottoms are golden brown and sound hollow when tapped.
Remove from the oven and allow to cool for at least 20 minutes before slicing.


Hope you try this recipe sometime....


Until next time .....  enjoy some cool weather comfort food!! (but not too much).


Saturday, October 6, 2012

Pumpkin CinnaBuns for Thanksgiving


Put on your favourite Johnny Reid CD and bake some Pumpkin Cinnamon Buns!!!

It's hard to keep my toes from tapping while he sings some of my favourite songs like "Today I'm Going to Try to Change the World" and I literally found my self dancing around the kitchen table to his upbeat song "This is Not Goodbye".  Sure hope no one was looking into the window - I looked pretty silly, apron tied on over my PJs - my favourite kind of day!!!

These rolls are easy to make, taste delicious, and have a nice pumpkin colour!  Perfect for that Thanksgiving pot-luck dinner.


Maple Pumpkin Cinnamon Rolls

½ pkg. vanilla instant pudding
¼ Cup milk
1 Cup canned pumpkin puree
1 tsp. salt
¼ tsp. nutmeg
¼ Cup butter – melted
1 large egg – lightly beaten
1 pkg. active dry yeast (2 and 1/4 tsp.)
1 Tbsp. sugar
¼ Cup warm water
4 Cups all-purpose flour
Filling:
1/3 Cup butter – softened
1 Cup brown sugar - packed
1 ½ Tbsp. cinnamon
Maple Cream Cheese Frosting:
1 ½ Cup icing sugar
6 Tbsp. cream cheese – softened
¼ Cup butter – softened
¼ tsp. maple flavouring (I used 2 Tbsp. pure Maple Syrup as well)
½ tsp. vanilla
1 Tbsp. milk

Whisk together the pudding and the milk.  Stir in the pumpkin and whisk to combine.  Add the salt and nutmeg.  Whisk in the melted butter and egg.  Set aside while you prepare the yeast mixture.
Combine the warm water and sugar and sprinkle on the yeast.  Stir lightly just to combine.  Let stand for 5 minutes till mixture is foamy.  Slowly add the pumpkin mixture and mix on low till combined.  Mix in the flour – 1 Cup at a time.  If using a stand mixer – use the dough hook and mix on low for 7 minutes or knead by hand on lightly floured surface for 9 minutes until smooth.  Place dough in an oiled bowl, cover with plastic wrap and let rise for 1 hour.
Meanwhile prepare the filling and soften the butter.
Turn risen dough onto a lightly floured surface and roll out to a 11 X 18 inch rectangle.  Spread with softened butter, sprinkle on the brown sugar and cinnamon mixture and press into the butter.  Roll short ends (on left and right sides) over slightly to keep filling in.  Now roll as tight as possible on the long edge – rolling away from yourself.  With a serrated knife cut into 14-16 pieces for regular sized rolls or 7 for jumbo cinnamon rolls.  Place cut side up in lightly greased cake pans.  Cover again with plastic wrap and let rise for 20 minutes.  Prepare the icing while dough is rising – beat the cream cheese with the butter till smooth, add in the flavouring and beat till smooth.  Add in the icing sugar a ½ Cup at a time and beat till smooth and soft.  Add 1 Tbsp. milk if needed to make a softer icing.
Bake at 350 degrees for 20 minutes.  Frost the rolls while they are still warm.  Enjoy!


Now set aside the two pans of buns that look the best - for Thanksgiving Sunday.
Put the tea kettle on, make your favourite cuppa and dig into one of the less perfect buns from the 3rd pan!  After-all, you have to test them to make sure they are O.K.!!!

Till next time ..... cleaning up the kitchen!


Friday, October 5, 2012

Fall of 1939


It was 1939.
My mom and dad (on the left)
and
Uncle Solly (dad's brother) and Aunt Eva (on the right)
posed for a rare picture in front of
the Milverton Train Station,
a short time before they were about to be married!


All four of these dear ones have passed - Eva as recently as eight weeks ago!


The wedding took place 73 years ago on October 5th, 1939!
World War II had just begun in Poland.

I wonder what my grandparents thought 
about this young couple getting married
in such troubled times!
Were they even aware of the unrest in Europe?

There were no wedding pictures taken
but thankfully a few were taken during
their courtship.
By whom, I don't know but I'm so 
glad we have them!

 Notice Mom holding a camera and my Dad with his signature Bow Tie!


It hit me hard how much I miss them
when a few days after our daughter's 
wedding, I laid some of the wedding 
flowers on the grave.
Oh how they would have loved to be in attendance at
their beautiful Granddaughter's wedding!
She would have loved that too....


Here at their 50th wedding anniversary Dad get's a kiss from that recent bride, as cousin Amy looks on.


I am so very thankful that I had such wonderful
parents who endured many hardships,
loved each other and each one of their 8 children with
unconditional love, enjoyed and loved all of their 
24 grandchildren, and left us with a
"Goodly Heritage....Psalm 16:6"!


Till next time ..... remembering and thankful!!

Tuesday, October 2, 2012

Belgian Endive Appetizer


This makes an attractive large platter of a relatively healthy appetizer.

I've combined several recipes for the "filling" but you can use your favourite combination of cheeses and flavourings.

The original recipe makes two large platters so I divided the recipe in half and still had too much!

Following is the recipe for one platter.....


Caramelized Pecans - make these first so they cool.
1 Cup Pecans - chopped
1/8 Cup butter
1/4 Cup sugar mixed with 1 tsp. Chili Powder
In a skillet on medium heat, slowly heat the Pecans, butter
and sugar mixture, stirring constantly until the sugar melts and the nuts become caramelized and golden.  Pour them out onto waxed or parchment paper to cool, spreading them in a single layer to avoid clumping.  Cool.

Filling:
1/2 package cream cheese - softened
4 oz. Gorgonzola - I used soft goat cheese
3 Tbsp. Whipping Cream
1 tsp. Extra Virgin Olive Oil
1 Tbsp. chopped Dill
Beat on high for several minutes until smooth.
Stir in the chopped dill and season with salt and pepper to taste.


Prepare 5-6 small endives by washing and separating the leaves. Cut the ends off to separate them.  Sort the leaves from large to small and dab them with a paper towel to remove excess moisture.


Spread each leaf with the cheese mixture.  I used an icing decorator to pipe filling onto the leaves but you can also fill them by simply spreading the filling with a knife or spoon.


Arrange the filled leaves on a large round platter using the larger leaves for the outside round and the smaller leaves for layering. Sprinkle the arrangement with the caramelized pecans and garnish the middle of the platter with grapes or strawberries.  Refrigerate until ready to serve.


This was made for a recent ladies salad luncheon that we had at our church.  The luncheon was followed by a thought provoking presentation on how to write one's own Personal Mission Statement!  It's hard to put into written words what we see as our own personal strengths and abilities, our core values, our deepest passions, our views on life and how we want to live out the rest of our lives to make a difference!  We had wonderful food and much, much more "food for thought".  This was a very worthwhile exercise and starting point to which I can work on and refer to as my life changes and evolves.  I have much work to do and thoughts to ponder as I attempt to write my Mission Statement! Thank you Heather for leading us through this exercise.


Till next time..........what attributes and God-given call would be part of your Personal Mission Statement?


Leaping into February!

  Just turned the calendar page for February and LOVE the caption for this LOVE month on the doorstep. ...  and, there were tulips at the gr...