Live Feed

Tuesday, November 22, 2016

The Walnut (no walnuts) Cake

The Walnut (no walnuts) Cake

This is the cake that my mom so often made as a birthday cake!
Her children and grandchildren remember this cake well.
It was called Walnut Cake but she never used walnuts,
in fact, she often decorated the top with pecans!

I have her hand written recipe which says it came from "Mrs. D. Schwartz",
her sister-in-law - Dad's sister Esther!
I wonder sometimes if my cousins, Laura Ann, Irene, Florence, David, and Wayne
remember their mom making this cake and if so how it was different.
Did Aunt Esther actually use walnuts or raisins???
Did she put brown sugar icing on it like Mom did???

My daughter, Becky, turns 33 today - I simply can't believe it
and this is the cake she requested - eek!
I know that my sister Evelyn has mastered the recipe (with it's scant/no instructions)
but I will give it a try.
After all, it has been so long since I've been able to bake a cake for Becky
on the day of her actual birthday.
In the past years, her birthday was celebrated by telephone or FaceTime while she was living in Alberta!
Sometimes I would bake a cake anyhow for the farmer and I - 😏

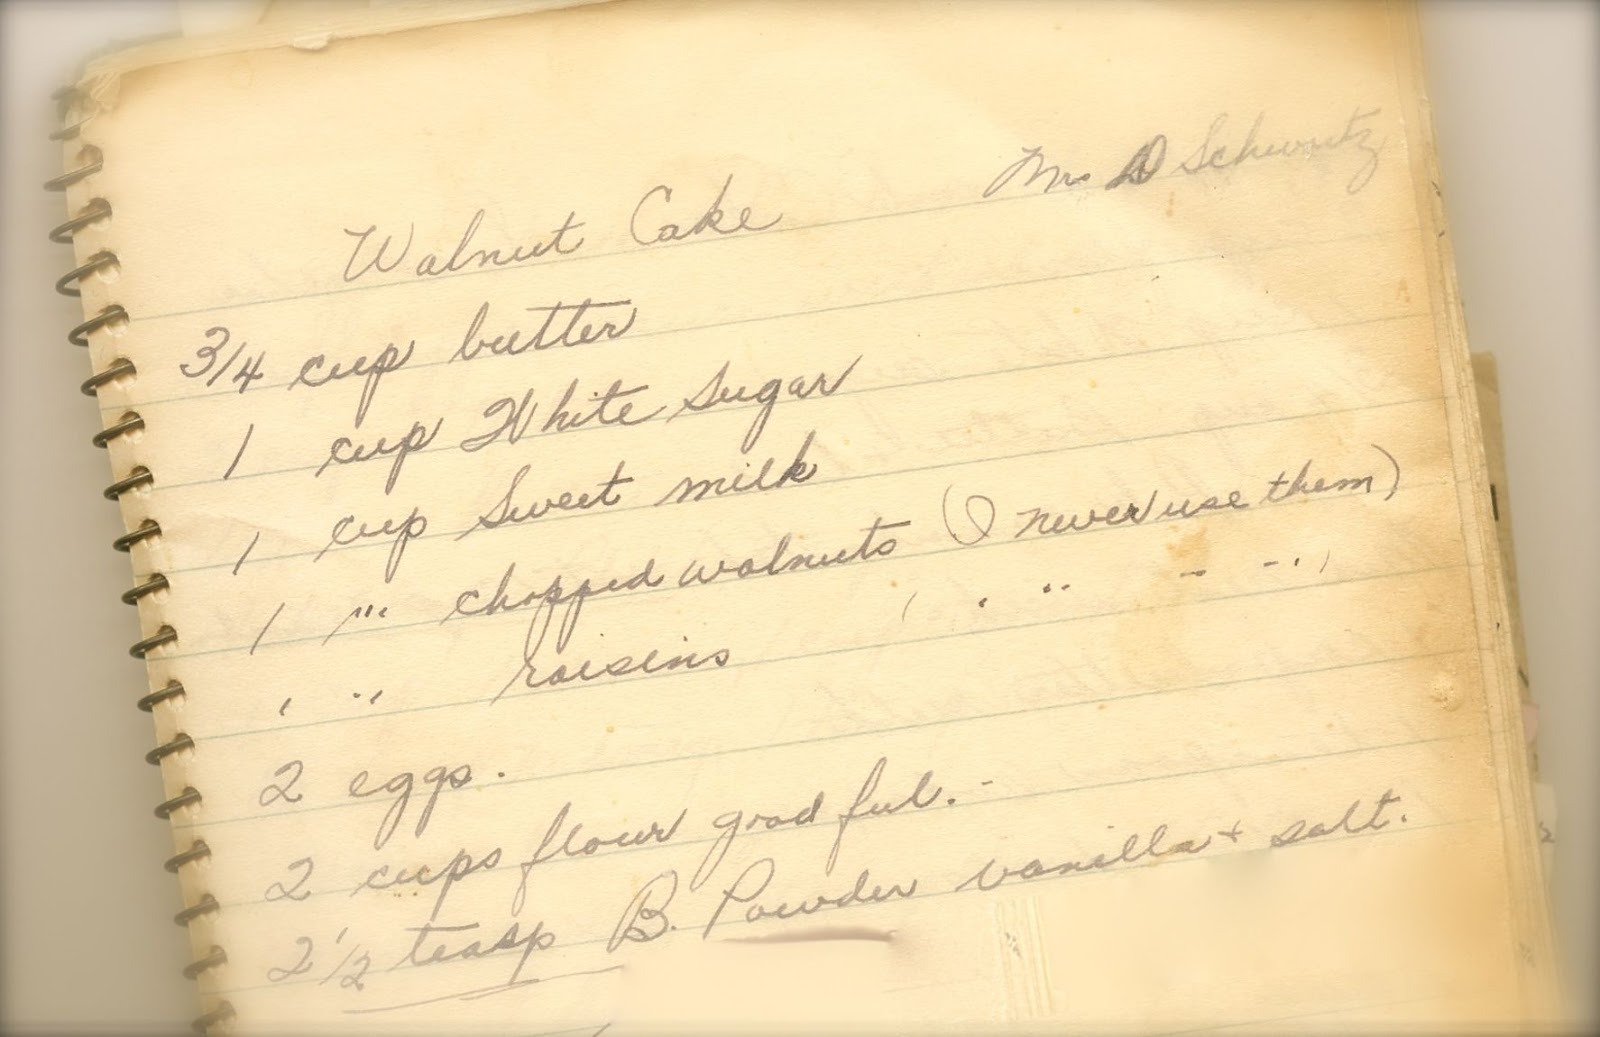


I began bravely, after consulting with my sister, putting together the ingredients.
On one of the recipe cards she had written "mix in order and alternate milk and flour".


First I greased and floured the actual cake pan that she always used for this cake.

Somewhere I found a recipe for greasing cake pans that is used by professionals so I mixed up a batch, greased the pan and floured it.

Cake Pan Grease:
Equal parts vegetable oil, shortening, and flour.
Beat till well blended and store in fridge for up to 5 months. This stuff really works well.


The cake baked beautifully (much to my surprise) and came out of the pan perfectly.
I didn't know what temperature to bake it at or how long but used 350F and baked for approx. 45-50 minutes or until a toothpick inserted in the middle came out clean.


Now the icing (the cake with the "brown" icing) as requested by my birthday girl....
I wonder if this is why they all loved this cake?

Mom's Brown Sugar Icing (as written by her)

1 Cup Brown Sugar - packed
½ Cup Sweet Cream
“Boil till it forms a soft ball in bottom of a glass of cold water.  Add vanilla and a nice (walnut size) piece of butter.  Take off heat and stir till cool and creamy.  Lots of luck, Sarah”

I believe a walnut size of butter is about 2 Tbsp. - I used a heaping 2 Tbsp.

This is the actual depression glass cake plate that Mom always used to serve her Walnut Cake!

With a little fiddling and much needed practice with the icing technique,
it's iced and ready to go.


Pecans - no walnuts in the house, and Mom's apron
Just maybe she never had walnuts around either and used pecans instead? Who knows?


I'll come back later and let you know how it tasted and whether the "Walnut Cake"
 made the grade....

I think it was a success ...


The cake was a tad too sweet - but not as sweet as this girl of ours!
Happy Birthday Becky!


Oh, and one more thing - exactly 5 years ago I posted my very first blog post - Wow!
Here is the link .... (for some reason the pictures did not show up except for one)?
http://rhubarbandroses-rosella.blogspot.ca/2011/11/60s-here-i-come.html 


Till next time ......... Thanks Mom for being the wonderful mother you were and for making amazing memories for us all!!!! I miss you always.


Tuesday, November 8, 2016

Planting Garlic and The Disappearing Nine Patch!

It's time to plant the garlic!

We purchased some amazing seed garlic from a local humble grower,
Shallot Hill Farm.

This producer, James Harrison, works his fingers to the bone, 
growing shallots, amazing garlic, kale, celery root, sunchokes, a variety of onions,
and much, much more.
He supplies many high end restaurants in our area who feature locally grown produce!

Look at the size of this seed garlic!


We cracked  and planted these beauties just before the rain this morning.


I can hardly wait till next summer to harvest this deliciousness!


Another item he sent home with us was a celery root.
I have never eaten this but it is apparently very good used fresh in salads or roasted and made into a creamy fall soup (I might try that).

He also sent us some "sunchokes" aka Jerusalem Artichoke.
I have never even heard of this but apparently you can also plant this in the Fall.
It grows very tall with yellow flowers and the root can be roasted and eaten as well.
It sort of looks like ginger?

So - we planted a few of these - at the end of our strawberry patch.
(I am noting this here so that I remember what is growing there next summer - eek).


It's fun trying different things.
Perhaps, however, I should have read this article before adding this exotic vegetable
to our garden?
Oops - too late.


On another note - 
I had the privilege this week of being part of a quilting project
at the college where I formally worked - what a great bunch of quilters!
I learn so much from these talented ladies.
The project they are working on for the New Hamburg Mennonite Relief Sale next May is
called "The Disappearing Nine Patch".
I love the pattern and especially the colours that are being used.
Here are a few pictures I snapped as the blocks were being created ...


Nine patches are sewn together, then cut into four, rearranged and sewn back into one patch - cool!

This has me going through my own stash of fabrics and is inspiring me to recreate this pattern too.
The quilt blocks will be sewn together before Christmas and then set up in the college
library atrium for hand quilting in January and February.
Hope I will have some chances to join in on the finishing of this project.

Till next time - have you done any Fall plantings or quilting projects?


Thursday, November 3, 2016

Play Dough and Bulbs

A dreary November day calls for some fun ...

It's easy to make ...

2 Cups Flour
½ Cup Cornstarch
1 Tbsp. Powdered Alum
2 Cups Water – Add Food Colouring to Water for Easy mixing 
1 Cup Salt
1 Tbsp. Oil
Heat in a sauce pan, stirring constantly until mixture thickens into a dough consistency. Remove from heat and let cool slightly. Add a few drops of essential oil for nice smelling dough (optional). Knead till smooth.  Store in airtight container.
I made a half batch this time.


She loved playing with it as Elmo looked on.


Today on November 3rd I finally got around to planting the
special tulip bulbs developed to celebrate Canada's 150th anniversary in 2017.


They are in the ground on either side of the arbor.
Here's hoping for a nice showing in the Spring of 2017.

A great way to celebrate Canada,
our "home and native land"!!!

We have so so much to be thankful for ...... 

Till next time .... how is your November beginning?


Monday, October 31, 2016

Pumpkin Muffins

BOO!!


We had a wee afternoon Hallowe'en Party,
this sweet little unicorn and I!!!
(She is the pumpkin of my eye).

While the darling magical creature napped,
we baked some pumpkin muffins
in case there are any goblins tonight.
(thankfully homemade treats are still acceptable here in the country!)


Taste test!


Pumpkin Muffins

4 Eggs
2 Cups Sugar
1 Cup Oil
1/2 Cup melted butter
1 ¾ Cups pumpkin
3 Cups all purpose Flour
1 Tbsp. cinnamon
2 tsp. baking powder
2 tsp. baking soda
½ Cup raisins
1/2 Cup Butterscotch chipits
Frost if you wish - I used a brown sugar icing this time.

Beat eggs; add sugar, oil, pumpkin and beat.  Add dry ingredients and mix until smooth.
Stir in raisins and chipits.
Fill muffin tins and bake at 375 degrees for 15-20 minutes.
This makes 24 muffins.


Grammie, what a big nose you have!!!!


Twinkle, twinkle little love!

Monday, October 10, 2016

Prize Pumpkin Pie

Happy Thanksgiving
to all my friends and family in Canada!

It just wouldn't be right if I didn't bake a pumpkin pie or two today.
This is our favourite recipe and a winner for sure!

Light (as in fluffy, not the other kind of lite) and delicious!
I know - I thought I would diet and fast this week - sigh.
There's always next week right?


Prize Pumpkin Pie

Makes two pies – one for you and one for sharing J
4 eggs - beaten
2 egg whites beaten till stiff and set aside
1 Cup brown sugar
1 1/2 - 2 Cups pumpkin puree (not pie filling)
2 Cups whole milk
1 Tbsp. melted butter
1 Tbsp. flour
1/2 tsp. salt
1/4 tsp. ginger
1/4 tsp. nutmeg
1 tsp. cinnamon

Beat the 4 eggs and then add in the rest of the ingredients (except the 2 egg whites).  Beat the egg whites till stiff and fold in last.  Pour into 2 unbaked pie shells.  Bake at 350F for 10 min.  Reduce to 275F and bake an additional 30-40 minutes or until knife inserted comes out clean. Serve with a dollop of whipped cream if desired.

Hint - if using a store bought pie crust (like I did this time) be sure to set the foil pastry lined pie into one of your own pie plates so it bakes better.


We enjoyed a wonderful thanksgiving dinner with most of our extended family
in the old stone house at Hidden Acres Camp.
Our church and family have a long history with this camp and it's been
too long a time since we've spent some quality time there.
A wonderful day indeed!


"Thankful Be"


Till next time - going for a long walk before digging into that pie ...


Thursday, October 6, 2016

Thankful Be!

So thankful today for SO many things:

Spending time with friends - Fall camping on the beautiful shores of Lake Huron.


Thankful for a "goodly heritage" and family reunion (my mom's side of the family)!


For the love of our wee family, who has made the long trek to relocate near to us
 and especially for this darling grandchild
who fills my heart to overflowing!


Now it's time to settle down and get going on the plans for our extended family 
Thanksgiving dinner ....  

Today I will roast the turkey ahead of Sunday's dinner. 
It just makes the day of the dinner so less hectic when the meat is done.
Here is a page from my yet unfinished family cookbook, explaining how Mom did the turkey
(of course there was never a written recipe - she just knew how).
I've also noted some other ways to roasting this delicious bird.


Mom's Roasted Turkey
I remember that this is the way Mom did the Turkey.  She washed the thawed bird, patted it dry and then rubbed the inside with salt and pepper.  She would then stuff it with her delicious bread stuffing (see recipe called “Grandma Gerber’s Turkey Dressing”).  She then rubbed the outside of the turkey with melted butter and sprinkled it with salt, poultry seasoning and a bit of flour.  Sprigs of parsley and small chunks of butter were placed on top and into the wing and leg folds.  A bit of water was added to the roast pan (about ½ - ¾ Cup).  The bird was roasted at 350F uncovered – allowing approx.. 30 min. per lb.  The turkey should be basted with hot drippings every 20-25 minutes.  A foil tent can be put over bird near end of roasting to keep it from getting too browned.  Delicious gravy was made with the strained drippings and some flour to thicken.  Mom never used a meat thermometer but if using one – the turkey should have an internal temperature of 170-180 degrees.  Juices should run clear and fork should turn easily when testing the thickest part of the breast or thigh.

Note – the kitchen staff at the college where I used to work, roast the lrg. turkeys while still frozen (not even removing the giblets etc.)  They rub the turkeys with olive oil, sprinkle with salt and seasoning, add 3-4 Cups of water, cover and roast overnight at 250F!!!  How easy is that!  No worrying about how to thaw the turkey safely and the meat is very tender and tasty and there’s lots of juice for gravy!

I like to roast my turkey a day ahead as to avoid the mess on serving day.  Slice and put roasted turkey in shallow roast pan, pour some of the strained juices on the meat to keep it moist.  Refrigerate or freeze.  Reheat at 375 degrees for 30 minutes or until hot.  My SIL Gloria sometimes puts mushroom soup and bread crumbs on the turkey to reheat it.  This is delicious as well.


Oven ready

How do you roast your turkey? Do you stuff it first?

Click on the above link for that recipe.


Till next time ... Blessings and Happy Thanksgiving to all our Canadian friends and family!


Mid Summer

Mid-Summer 2026   Where did June and July go? Where did my chutzpah go? Seems impossible that the time has passed so very quickly these last...